Do your cats love to sleep on a hammock? But, the one available in the pet store is not so sturdy, and it is quite expensive too, right?
What if we tell you can create a nice, durable, and budget-friendly hammock at home with minimum supplies?
Yes, with CatLovesBest it is possible because we have got 6 easy DIY cat hammocks project just for your furry friends. These are perfect, and you can carry them while you are traveling too.
Now, you can give your wonderful gift made with your hands, I assure you that your cat will definitely love swinging on these 6 fantastic hammocks.

6 Creative DIY Cat Hammocks Project
Just like scratching post and litter box is essential for felines need similarly cat hammocks are also vital. It satisfies her urge of watching things away from the floor.
So, are you ready to make easy and cute cat hammocks?
1. Easy Cardboard Craft DIY Cat Hammocks
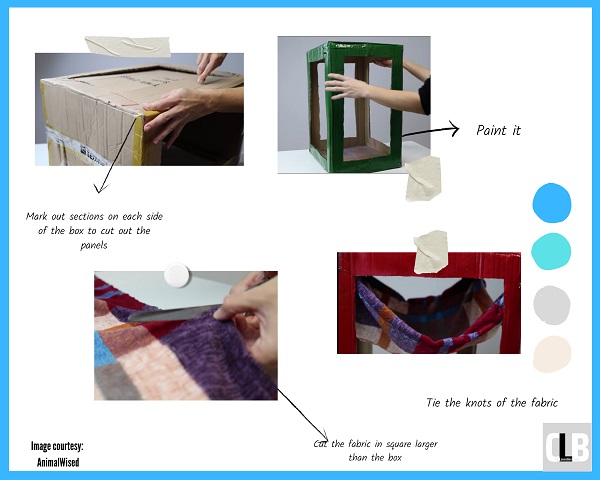
If you have scrap cardboard at home don’t just throw it away this time you can make a simple yet cute cat hammock from that.
Materials required
- Pencil
- Marker
- Knife or cutter
- Paint colors
- Fabric or canvas
- Sharp object to drill
Instruction
Step 1
First, we need to mark out sections on each side of the box to cut out the panels. This requires a margin of about five cm from all the edges.
Step 2
Do this until you have four even panels on each side. Now, you have to begin to cut out the panels with a box cutter or utility knife.
Step 3
When panels will be removed you will be left with a structure allowing entrance from all sides.
Now, it is the time to paint and decorate. Don’t forget to paint all the sides as well as the top. Take a piece of sturdy fabric and cut out the square larger than the size of the box. So, that it will become big enough to dip in the middle for a cat.
Step 4
Cut each corner of the square with a diagonal slit about four inches long. With the sharp object drill into the upper part of all sides of the structure.
Step 5
Once all the holes are made all you need to do is pass the split corner of the fabric square through and tie them in a firm knot.
Step 6
This allows the fabric to fall in the middle and act as our cat hammock. With this, our hammock is ready to use.
2. Swivel Clamp Hammock
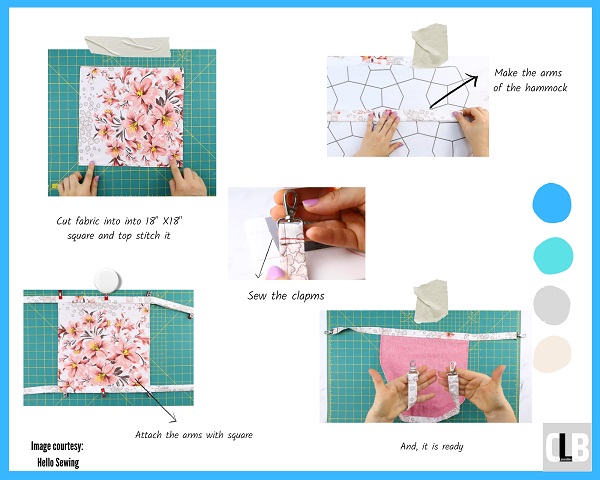
You can easily manage this hammock and clip it anywhere you want. You carry it easily outdoor too. It is easy and soft.
Things required
- Main fabric or fleece sheet
- Coordinating fabric
- 2 fabric strips for the arms
- 4 swivel clamps
- Pins or clips
- Scissors or rotatory cutter
Instructions
Step 1
Cut 2 pieces of cotton fabric for the base 18″ x 18″ then cut two fabrics for the arms 3″ x 40″. Place the fabric on the top of each other facing it on the right side.
Step 2
Then stitch using 1/4″ seam allowance. Flip the fabric turn it inside out. Then do the top stitching. Now, we will make the arms of the hammock. For that, you have to fold the strips in the half lengthwise and press it with iron.
Step 3
Then simply open up and fold both raw edges to meet in the middle. Then fold along the original crease.
Now, it’s time to test how it will adjust the swivel clamps into the strip. After fitting adjust the clamp if required as per your need.
Step 4
Again fold it and press the other set and similarly add the clamps inside that too. Then you have to mark the midpoints.
Simply fold each strip in half and mark. Then you have to fold the base in half then mark the middle of the raw edges.
Step 5
With the midpoint aligned wrap arm strips around the top raw edge and pin it. Repeat the same step for the bottom raw edge too.
Finally, with the help of a needle and thread lock the arms appropriately.
TIP: Sew a box “X” stitch to reinforce the high-stress area.
Then insert the swivel clamp and fold under the raw edge then pin and stitch on the top of it back and forth.
Attach the rest of the swivel clamps at an equal distance from the middle. Make sure all hook placement is facing the same way.
And, it is ready now you can fix this hammock anywhere you like.
3. DIY Teeshirt Cat Hammock
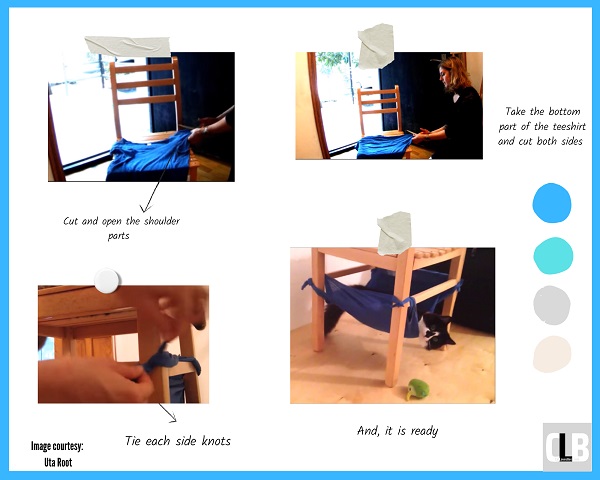
Try our easiest cat hammock idea. It can be made in 20 minutes, and it is very easy, quick and your cat will love using it all the time.
Things you need
- Teeshirt
- A pair of scissors
- A wooden chair
Instruction
Step 1
First, you have to take your tee shirt then cut and open the shoulder parts of the tee on both sides.
Now, take the bottom part of the teeshirt and cut both sides open 15-20 cm.
Step 2
Now, let’s tie the end of the teeshirt around the legs of the chair. For this, take the front side of the teeshirt and put it over the stretcher. Then tie a double knot. Repeat the same step on the other leg side. And now, it will keep hanging.
4. DIY Cat Hammock Using Doormat
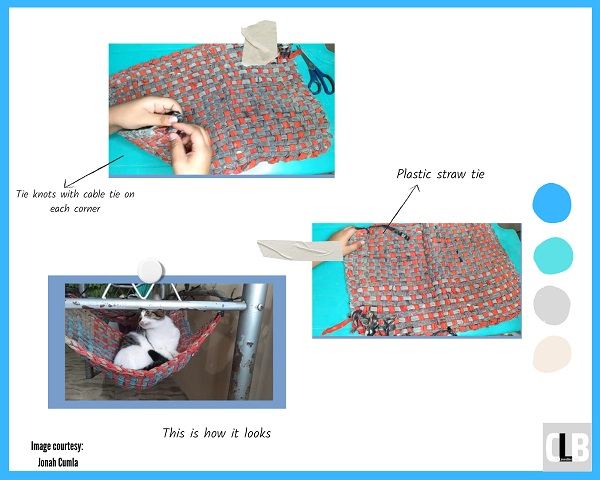
This hammock is simple you can make it in 15 minutes. Yes, really!
Things required
- Scissors
- Plastic straw tie/ cable tie
- Clean mat
Instructions
Step 1
Simply use knotted doormats for this as it will help you to make the hammock easily. As you don’t need to make another hole just to attach the plastic straw.
Step 2
If you don’t get that no worrier you have to make four holes in the four corners of the mat and tie the plastic straw tie. Just make sure that you tie it appropriately to avoid mishaps event like your cat falling off the ground.
Step 3
Also, make sure the size of each plastic straw is the same size on each side. Once the knots are ready you can simply clip that to your table.
5. DIY Hanger Cat Hammock
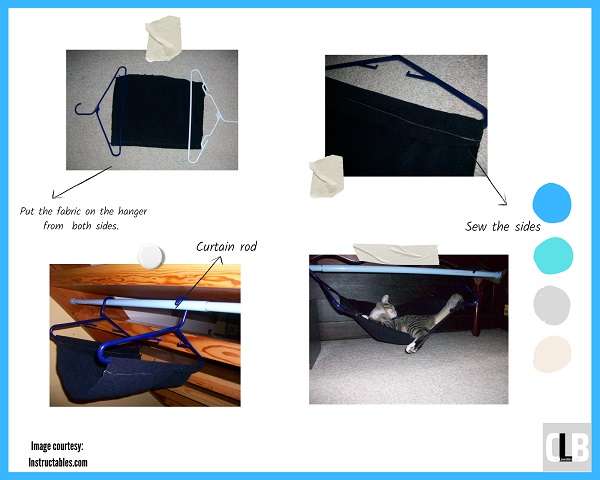
Let cut the chase and work on the hanger hammock!
Things required
- A 24×14 piece of fabric
- Two sturdy hangers
- Sewing Machine
- Curtain rod
Instructions
Step 1
Let’s start. You have to put the fabric on the table or the ground. Then simply put the hanger on both sides. Make sure to leave about 3-4 inches of space to curl the piece of fabric into the hanger for stitching.
Step 2
Stitch the upper portion of the loop through the part, so it looks like the pictures. This will be the main body of the hammock.
Step 3
Hang the hanger on the curtain rod under the table. And, it’s done!
6. DIY Easy Peasy Under Table Cat Hammock
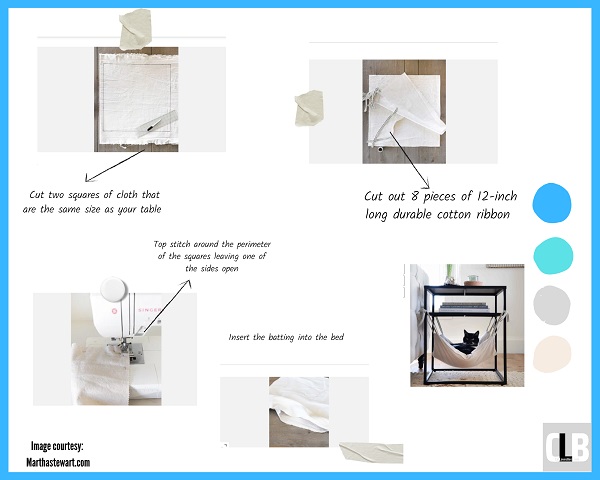
You can easily accommodate this hammock under the table.
Things required
- 1 Yard strong fabric
- 12″ twill tape
- Batting fabric
- Ruler
- Table (optional)
- Scissors
- Sewing machine kit
- Pins
Instruction
Step 1
You have to first measure the dimensions of the table you have taken. Then cut two squares of cloth that are the same size as your table. And, leave 1 inch (for seam allowance).
For instance, the measurement of your table is 20″ X 20″ then you have to trim two squares in 21″ X 21″.
Step 2
Now, you have to cut out 8 pieces of 12-inch long durable cotton ribbon or trim.
Step 3
Then put away one square shape cloth for now and pin two strings of ribbon at a little diagonal at each corner on the other side. Make sure to pin down the ribbon in the right direction on the cloth.
Step 4
Afterward, sew the perimeters of the top square and leave one side open. To make it durable you can double stitch it from the inner side also.
Step 5
Further, sew the corners in the curve design to give it a nice edge. Now, flip the cat bed inside out and iron the seams properly.
Step 6
Cut out a part of batting fabric to fit the cat bed’s dimensions. Then put it inside the cat bed. Sew the top portion to close the opening after folding and pinning the open side shut.
Step 7
Then simply knot the bed with the table legs and adjust its height as per your need. And, it’s ready to use.
Well, That’s a Wrap!
In conclusion of the DIY cat hammocks we would, we have curated 6 amazing ideas for your kitty. These are easy and can be made easily at home.
But, make sure that the knots are tight, the fabric you use is made of good materials otherwise it can cause accidents; your cat may face severe health problems.
You can make a Macramé style hammock or fit screws and hang a wall hammock. If you use our ideas make sure to leave a comment.
References
- Do cats like hammocks — Oakland Animal Services

