Are you sick of your cat scratching your couch, bed, and every corner of your house?
Well, it’s time that you redirect her energy and build a scratching post to satisfy her urge.
Cat scratch their paws to release pheromones and to keep their nails sharp, and it is a natural feline habit that you cannot stop. But, you can save your house from their paw marks by making some DIY cat scratching posts.
We have jotted 6 amazing easy DIY projects you can easily learn to make and prepare in 30 minutes.
6 DIY Cat Scratching Post Projects
We have curated 6 amazing DIY cat scratching posts for your furry friend. She will surely play with it and satisfy her scratching urge too.
These are easy projects which can be made in 30 min to 1-hour max. You can build a cat scratching post with your kids too it will be more fun.
So, let’s get started.
1. Easy Cardboard Cat Scratching Post
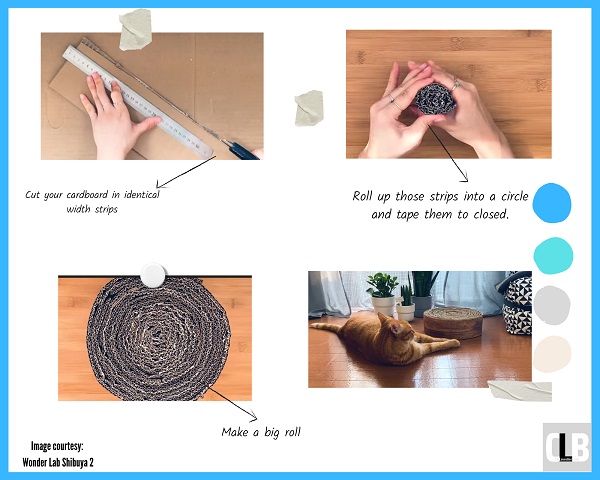
We have a lot of cardboard at our house which is always thrown into the bin this time you can build a scratching post out of that. It is easy and can be made with minimal supplies.
| Things You Need |
|---|
| A cardboard box |
| Ruler |
| Pencil |
| Paper Knife |
| Decorative Paper |
Step 1
Cut your cardboard into identical width strips. You have to prepare a bunch of those strips.
Step 2
Roll up those strips into a circle and tape them to closed.
Step 3
Now, you will have a big cardboard roll. You have to stick the little fancy around the outer side. It is ready to use. Keep it vertical, and you can add some catnip to entice her too.
2. Build Your Own Cactus Cat Scratching Post
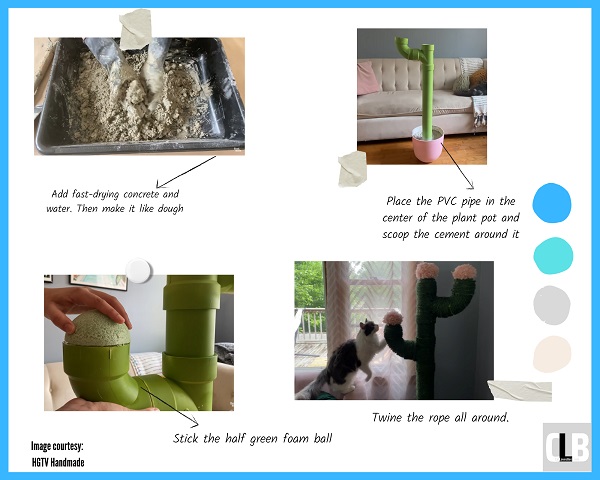
Try some unique designed scratching posts for your kitty. Use PVC pipes to make a cactus scratching post.
| Things you need |
|---|
| 3 feet PVC pipe |
| Green Spray Paint |
| 2, 90-degree Elbow |
| 1 small piece of PVC pipe |
| Fast Drying concrete |
| 1 Plant pot |
| Gloves |
| A big tub |
Process
Step 1
You can paint the PVC pipe a green color and let it air dry.
Step 2
Take the big tub and add fast-drying concrete and water. Then make it like dough. We will use about 10 pounds of concrete to hold the plant pot sturdy.
You have to follow the direction given on the concrete bag for proper measurements. Once, it holds together you really need to work fast because it will dry super quickly.
Step 3
Now, scoop the cement into the plant pot to level up the bottom. If you don’t want to work with cement then you can use rock and stones too.
Step 4
Place the 3 feet PVC pipe in the center of the plant pot and scoop the cement around it. Continue it till it is filled and wait until it dries.
Step 5
Make sure the pipe is standing completely straight. Now, that the cement is dry you have to build the cactus. First, connect the pot with the PVC pipe and add the elbow to it as one of the arms of the cactus.
Step 6
Next, you have to connect the PVC pipe to the extra piece of the six feet PVC. Then connect another at the top.
Step 7
Lastly, you have to add the elbow arm of the cactus.
Step 8
To add the round shape at the top of the cactus. We will cut the green foam ball in half. Then hot glue each half to the top.
Step 9
Once, everything is set it’s time to wrap the pipe with the twine. For that use hot glue to wrap up the whole PVC pipe with twine. And, it’s ready.
3. Modern Rainbow DIY Cat Scratching Post
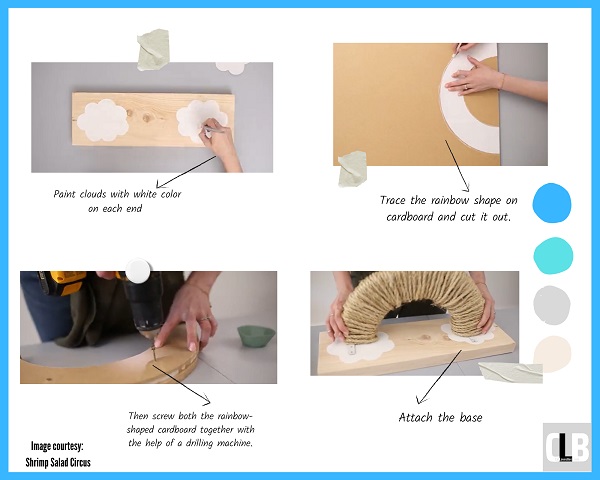
This one is a cute little easy-to-make scratching post that cats love playing with.
| Things You need |
|---|
| Rectangular wooden slab |
| White paint |
| Cardboard sheet |
| Screws |
| Drilling machine |
| Brackets |
| Hot glue |
| Sisal rope |
Process
Step 1
Take a wooden piece rectangular slab as per your requirement then paint clouds white color on each end.
Step 2
Trace the rainbow template on the cardboard box. Make two of them.
Step 3
Then screw both the rainbow-shaped cardboard together with the help of a drilling machine.
Step 4
At the bottom of the cardboard, rainbow sides add the bracket you can use wood glue it’s optional.
Step 5
Then wrap the entire rainbow-shaped cardboard with sisal rope.
Step 6
Wrap it till you fill the entire rainbow. Then fix the end with hot glue.
Step 7
With the help of a screw attach the rainbow where you made the clouds on the wooden slab. And, it’s ready to use.
4. Traffic Cone Cat Scratching Post
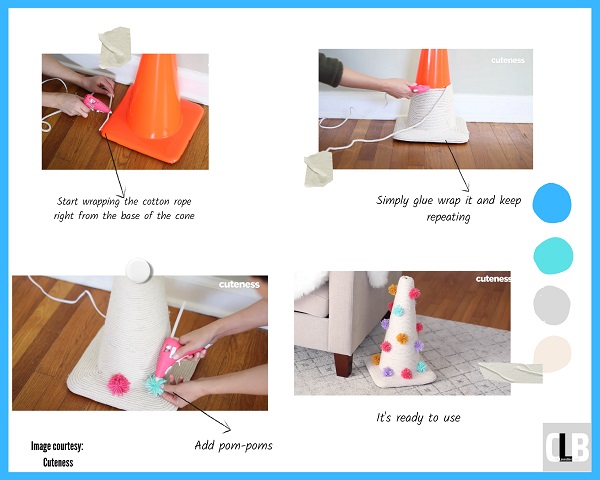
This is simple and can be made quickly in minimum supplies. You plus your pet will enjoy it.
| Things you need |
|---|
| A traffic cone |
| Cotton rope |
| Hot glue |
| Scissor |
| Pom-poms |
Process
Step 1
Start wrapping the cotton rope right from the base.
Step 2
Simply glue wrap it and keep repeating. If you leave gaps keep pushing the cotton row.
Step 3
Now, once you reach the top of the traffic cone cut the rope and stick its end with the help of hot glue.
Step 4
Add pom-poms to make it attractive and fancy. And, call your kitty cat to use it.
5. DIY Donut Cat Bed and Scratcher
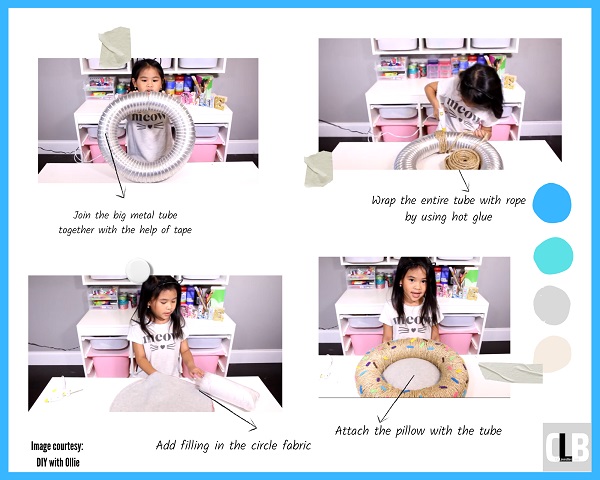
If you want to gift your cat an interesting bed that also satisfies her scratching urge then this is it. It is just for you.
| Things You need |
|---|
| A big metal tube |
| Tape |
| Hot glue |
| Fabric |
| Marker |
| Pillow filling stuff |
| Rope |
Step 1
Join the big metal tube together with the help of tape.
Step 2
Once the enclosed metal tube is ready wrap the entire tube with rope by using hot glue.
Step 3
Then put it on the fabric sheet and trace the donut shape on it. Make two circles.
Step 4
Then cut the fabric with the help of marking. Join both fabrics with the help of a hot glue gun. Don’t join the entire circumference remember you have to add the filling so, do leave space to put the filling inside.
Step 5
Then close the stuffing. Your pillow will be ready. Now, it’s time to put the metal tube donut on the circular pillow top. And, stick it with the hot glue gun.
Step 6
Make sure to press it down so that it sticks completely. And, then let it air dry. Turn around and it’s ready to use. Give your cat to sleep or to satisfy her scratching urge.
6. DIY Cat Scratcher Tower
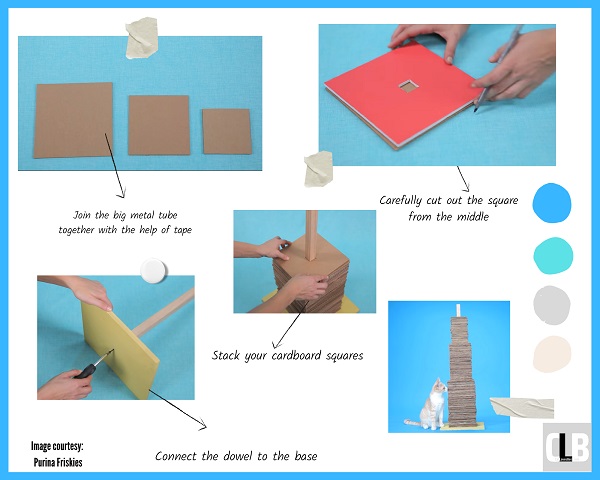
It is an amazing toy tower for your kitty cat which she will definitely enjoy.
| Things you need |
|---|
| 1 drill machine |
| 12′ X 12″ plywood |
| 1 Razor blade |
| a Screwdriver |
| a Pen |
| 3 Templates |
| A lot of cardboards |
Step 1
Cut one 8 inches by an 8-inch cardboard square, one 7 inches by 7 inches, and one six-inch by six-inch square.
Step 2
Now, this is a time-consuming and hectic task you have to make 80 pieces of 8″ by 8″ square cardboard boxes, 80 7″ by 7″ square boxes, and 60 pieces of 6″ by 6″ square.
Step 3
Moving on takes the six-inch cardboard to use the corresponding template to draw a 3/4 inch by 3/4 inch square.
Step 4
Repeat that step for the rest of the squares.
Step 5
Now, taking your cardboard carefully cut out the square from the middle. Do it the same with the rest of the cardboard pieces too.
Step 6
Then carefully drill at the center of the plywood base. After that carefully drill at the end of your dowel for about one inch deep.
Step 7
Now, connect the dowel to the base of the wooden base.
Step 8
Next, going from largest to smallest stack your cardboard squares (attach the post) on the base with the dowel going through the center. Keep at it. And, it’s ready to use!
Well, That’s a Wrap!
We have listed 7 amazing DIY cat scratching posts which will definitely satisfy your cat’s urge to scratch stuff and keep their nails sharp.
These are low-budget and less time-consuming. You don’t have to put extra effort to make this DIY project. I have even shared a cat bed scratcher in which your cat can sleep plus scratch interesting right!
If you use any of the DIY cat scratching ideas then please let us know below in the comment section. Also, do share it with other cat owners too!
References
- Cat Scratching Post — Wikipedia
- Scratching on furniture and carpet — Internation Cat Care
- Why do cats like to scratch — Hill’s Pet

