We have jotted down a few highly recommend DIY litter box projects for you. You can design any of these according to your cat choice.
Many cat owners don’t like litter boxes available in the market. They complain it doesn’t even last for a couple of months. Some complain their cat can’t fit inside and can’t access it due to the wrong size!
What to do then? Hey, why don’t you do a DIY litter box project? Gift your furry friend a unique homemade cat litter box right away!
But, hold on, you don’t know how to make a cat litter box? This can be complicated.
Well, not anymore. Because in this article, we will teach you how to make a cat litter box at home!

How to Make a Cat Litter Box?
Do a DIY cat litter box right away.
Now, you can make cardboard-based, tote bin, or plywood-based litter boxes for your cat. Simply read the steps given below!
1. Top Entry Litter Box DIY
Are you ready to make a DIY mess-free cat litter box with top entry? Then gather the listed below stuff now!

DIY litter box material list
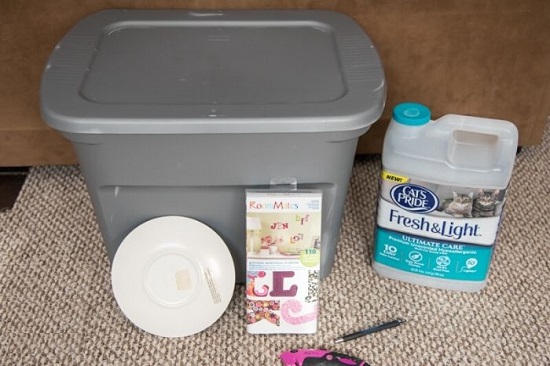
- 18-gallon tote bin
- Marker Pen
- Plate to trace the mark
- Box Cutter
- File
- Fancy Sticker (totally option)
- Cat Litter
Process
Step 1
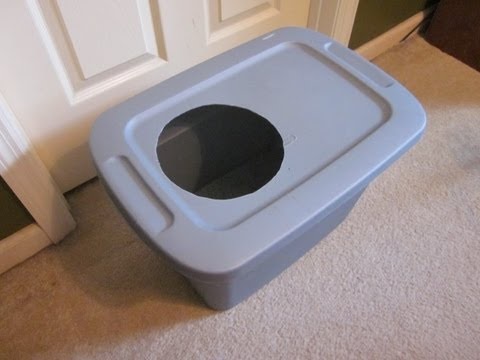
Take a Plate and place it on the top of the tote bin, and with the help of a marker, start making the circumference of the plate.
Step 2
Now, take a box cutter and start cutting the hole that you made earlier with the marker pen. It will be hard to cut the box, but no worries, you slowly keep moving the cutter back and forth and remove the circle.
Step 3
Now it’s time to file the edges. Make sure you smooth the sharp edges with a filer because there are high chances that your kitty may get hurt.
Step 4
This step is totally optional and up to you. If you want to make it a little fancy, you can paste the sticker on the outer side. But if you want it to be a simple DIY project, then it’s up to you.
Step 5
Time for the last step. Put feline litter in the box; make sure the litter is not deeply filled. Fill it in according to your cat choice!
And, finally, your easy-to-clean DIY tote litter box is ready to use! You can place her bathroom box where she likes. Keep it in the laundry room or in the garage.
To know more check out tidy cat breeze litter box reviews.
2. DIY Cardboard Litter Box
This homemade litter box made of cardboard won’t be that strong, but you can use this for temporary bases.

DIY litter box material list
- Cardboard Box
- A pair of scissor
- Tape
- Potty Pads or litter mat
- Litter
Process
Take a regular large sturdy cardboard box if you have a large size cat at home, or get a small or medium box if you are planning to make a litter box for kittens.
I have taken a 10-pound cat food card box to make my litter box, but you can take any cardboard box according to your choice.
Now, place scissors or a box cutter, packaging tape, and litter near to you. You can keep the potty pad in the litter box. But it is totally optional.
Step 1
Take time and plan the whole idea and orientation of the box—plan which side you want to put on top and which side you want on the bottom.
Step 2
Now when you have decided the sides now determine how high you want it to be. In my case my I am keeping a couple of inches as high because I am planning to make it for the kitten. If you are planning to make it for a big cat, then you can keep the sides about four to five inches high.
Step 3
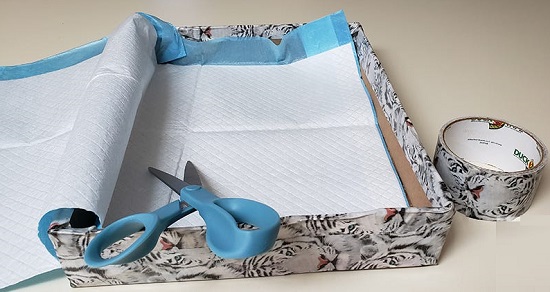
When you are cutting the sides of the cardboard box, use duct tape to shield the edges from inside and outside. You can fold the single strip over the cut edge of the sides. It will make the walls stronger. And also prevent moisture.
Step 4
Afterward, check the bottom and tape that too! Make sure to cover the edges, walls, and weak areas with tape.
If you are going to use the litter box just for once, then you place the litter in it. If you are planning to use it multiple times, then you can keep a potty pad inside it. The potty pad may not fit inside the cardboard litter box, so you can cut it according to the litter box size. Use tape to stick the potty pad at the bottom.
If you are using litter, make sure you don’t overflow it. As the box is delicate, it won’t be able to bear heavy weight.
Great now, your DIY kitty litter box is ready for use!
3. DIY Plywood Cat Litter Box
The plywood cat litter tray is sturdy, and I am sure your cat will love using it. To make this DIY litter box read, the following steps.

DIY litter box material list
- Large plate
- Litter Pan
- Measuring tape
- 1/2-inch thick plywood sheets
- Jigsaw
- Tarp
- Wooden Glue
- Nails
- Hammer
- Drilling Machine
- Screw Driver
- Two 2-inch-by-1-3/8-inch door hinges
- Four 1-1/2-inch-by-5-1/2-inch table legs
- Sandpaper
Process
Step 1
Start measuring the height, length, and width of the litter pan you already have. Now you have to find the size of the plywood sheet. For instance, my litter box measurements are 18.5 inches long and 15 inches wide, and 5 inches in height.
Step 2
Using the litter box dimension, determine the plywood dimensions. In our case, the length of six pieces is 20,” and for the front and backside of the width, you have to keep at least 1 inch extra to the length of the litter box.
Working on the width of the other two pieces, which will be used at the top and bottom sheet, you have to specifically add 1 inch extra. You can add extra length as per your kitty requirement. Make sure you don’t construct it smaller.
Step 3
It’s time to do some hard work, cut the plywood sheets!
Get six plywood board sheets, cut it either yourself, or get it done by the hardware store. Two sheets will be used for the top and bottom parts. The other two will be the sides, and the other two will use used for the back and front.
For your reference, I am providing you my six box sheets measurements 20 inches by 17 inches for the head and bottom. 20 inches by 20 inches for the sides and 20 inches by 16 inches for the front and back portion
Want to get rid of cat litter smell, know the ways how you can get rid of bad odor!!
Step 4
It is not a single sitting job. It will take, so have patience and show dedication!
Now, you have to cut a piece and make an entrance hole at the center or according to your choice.
Keep the litter tray on top of the sheet’s bottom section. Then place the front piece of plywood against it. Note down the height of the litter box on the front sheet.
Keep the front plywood sheet on the floor and mark the circumference of the plate with the mark you set for the litter pan’s height earlier.
Bear in mind the size of the circle should be large enough for a cat to get inside that easily. Now, make the plate circumference with the pen on it.
With the help of a drilling machine, make some holes inside the circle to cut the piece of her entry point. And make sure the size is perfect so that she can enjoy the breeze.
Step 5
Take sandpaper and smoothen the edges of the hole you cut earlier. File it from both sides. You can also smooth the other sharp edges so that it is safe for your kitty to use.
Step 6
It’s time to assemble things!
For the safe side, spread the tarp sheet on the ground and then lay down the bottom sheet of the plywood on the ground. Join the back and one of the side pieces to the bottom piece with wood glue. Use duct tape to join and support the pieces together. Then attach the other side and front sheet and then tape down the edges.
Don’t move it; leave it for some time. And let the glue dry.
Step 7
After the glue is set now, it’s time to use a hammer and nails.
Place nails in an even space, on each side of the piece, along with the bottom part. Then with the help of a hammerlock, the positions. Once done hammering, remove the tape that you stuck earlier from the edges.
Step 8
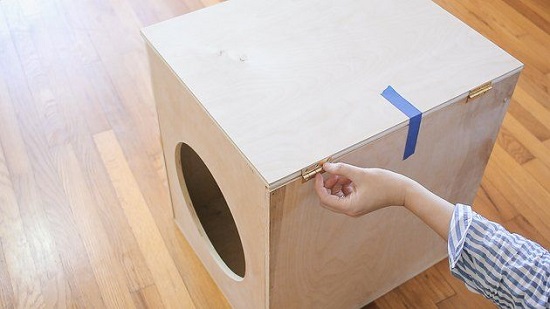
Put the top plywood sheet on the box top. Then make sure the one side of the door hinges should be attached to the top piece, while the other side should be attached to the side piece, spacing them three inches apart on either side.
Is your door installed well? Make sure to recheck the hinges are fixed appropriately or not.
Step 9
Now, fix the legs of the litter box. Flip the box upside down. Handle it carefully; the bottom side of the box should face your side. Keep the legs at each corner appropriately and then drill the hole and fix it with the screws. And, it’s done.
Step 10
Welcome to the last step! Now, flip the box again and put the litter box inside the plywood box. Pour the litter inside. Yay, your job is done.
Your homemade cat litter tray is all set to use! The best part of this DIY litter box is that you can open the door for easy cleaning, plus you can use both outdoor and indoors!
Are you find the top rated multiple cat litters Here you go!
Summing It All Up!
Litter boxes available in the pet store may not be long-lasting; therefore, know how to make a cat litter box right away by reading our article on DIY litter boxes!
In this post, we have added cardboard cat litter box ideas, how to make a DIY top entry litter box and DIY plywood cat litter box ideas.
I hope you understand our DIY litter box projects, have fun, and your cat like the homemade cat litter box!
Moreover, if you have multiple cats then the suggestion would be, that you should go and check out the best automatic litter box for multiple cats.
References
- DIY The Best Litter Box – Fundamentally Feline
- Building a Better, Biobased Cat Litter – Agricultural Research Service
- A tiny-home owner uses a genius storage hack to keep his cat’s litter box out of sight – Insider

